
Brisket
This is still an ongoing work. I'm posting it now while polishing it as well as waiting for comments and additions.
~thirdeye~
Last revision in August, 2023
The Ramblings of a Briskateer
I think this is the hardest how-to article I have ever put together. I come from two generations of barbecuists, and was lucky enough to have my grandpaw pass his techniques to me. When I was a little boy in the 60's I remember more brisket and chicken being barbecued than anything else. For what it's worth, brisket is generally regarded one of the hardest cooks in barbecue circles. Hard because it is a big hunk of naturally tough meat? Hard because it is a weird cut with all that fat? Hard because it takes a long time? Hard because it it is not very forgiving? Or hard because everyone that has figured out how to cook one tells you it is? It's got to be true, I've heard it my whole life and I've even said it on occasion. What I really believe, and don't say often enough is that barbecuing a brisket is a very involved cook. You can't get into a hurry and you need to pay attention to some details. The best place to start is with the rules. Some are old rules and some are new rules. The damn things keep changing because cooking brisket is a journey not a destination.
THE RULES
When choosing a brisket, select grade is fine .... No it isn't, if you can get a choice or prime one, buy it.
A limber brisket is a tender brisket .... I agree completely.
If a brisket is not limber, work it over with a rubber hammer, more on this below
Always buy a whole brisket .... Unless you can't find a whole one, then get the biggest flat you can find. If you can't find one 4 pounds or larger, get a chuck roll, some steaks or a tri-tip.
You have to cook a lot of brisket before becoming a good brisket cook .... This holds true for most things, it is especially true for brisket.
The best brisket is found in Texas .... A lot of good brisket is barbecued in Texas. The "best"?, well that might be true on some days but not on all days.
Only a Texan knows how to cook brisket .... Many Texans are excellent cooks. They cook a lot of beef there. I was born in Texas and my family has been there since the 1880's, so if that is an advantage I'll take it.
Never trim a brisket .... Some purists don't trim at all, I will remove some of the thick hard fat on the point, I don't really see this as "trimming" as most folks refer to trimming as reducing the thickness of the fat cap to a uniform thickness. A 1/8" to 3/16" of fat is mentioned often.
Cook brisket over a low fire of hardwood coals .... This is how I learned to cook all barbecue. Many of the traditional BBQ joints still use hardwood fueled pits. A lot of competitors are dedicated stick burners. If I could still use wood, I think I would. Now I use lump charcoal and hardwood for flavor. (It's noteworthy to mention that some of the oldest and most famous joints in Texas cook brisket over wood with high pit temperatures....more on this later)
Cook brisket with the fat side up/down .... See comments below.
Don't use too much smoke on brisket .... The fact is, you can over smoke beef, heck you can over smoke about anything. No matter what you cook, just be careful and develop your own taste for smoke flavor.
Use a Mop / Don't use a mop .... I am an old baster. Nuff said. I do wait several hours on flats or 5 or 6 hours on a whole brisket before I baste. I will do it 2 or 3 times only (not every 45 minutes or anything).
Never use sugar in your brisket rub .... I was taught not to use a sugar based rub, and that is one thing I have stuck with.
Never have a pit temperature higher than 215° .... Before 2003 none of the pits I cooked on had a thermometer. There is really no telling the actual pit temps we cooked with. I was taught to watch the surface of the meat for the bubbling fats and listen for the sizzle. These were signs to baste and ramp the pit temp down. Judging from the length of time the meats were cooked, I would guess the pit was running at 225° to 250° most of the time. Once I got interested in measuring and watching pit temps, I cooked in a range of 225° to 275°. For several years I have been experimenting with higher pit temps for cooking brisket. Spawned by many competition cooks, this idea is not as taboo as it was about 40 years when I received my first barbecued brisket teachings. Following a lower temperature "flavor smoke", ramping up the pit temp to neighborhood of 325° has produced some very nice flats for me and reduces the cooking time. I do use a long, foil wrapped rest in a warmed cooler and I consider the first hour or so of cooler time as part of the cooking time. As mentioned in the trimming comments, it's hard to find a nice flat that has not been over-trimmed. The only solution is to buy a whole one, remove the point yourself and leave the flat untrimmed or touch it up just a little. I have added some information at the end of the post about fast cooking / high temperature brisket cooks.
~~~~~~~~~~~~~~~~~~~~
Enough with the "rules" ......... now on to cooking a brisket. I discuss several options in this article:
1. Smoking just the brisket "flat", and cooking a "whole brisket" which is the flat and point.
2. Smoking your brisket "traditional" or "naked" meaning smoking your brisket the entire time in the smoker (usually low - n - slow) without wrapping in foil or butcher paper DURING the cook. This style requires minimal trimming of fat. Most purists go this route and you can produce a wonderful brisket. This style of smoking a brisket is popular in Texas. Warning, this method does take some practice, and requires the most time.
3. Smoking your brisket with a wrapped step (using aluminum foil or un-waxed butcher paper) which helps tenderize the brisket by braising for a few hours. Sometimes called the Texas crutch, this method is used by many newer cooks as the results are more predictable, it's easier to keep the brisket moist, and it takes less time than the traditional methods of smoking a brisket. Many competition cooks as well use a wrapped step to produce a tender, but not overly smoky brisket. And lastly, wrapping your brisket in the 160° range, provided you have some nice color, can help you get through the stall.
4. Smoking your brisket Hot & Fast. This method provides the shortest cooking time, but can be hard to master. It is popular with some competition cooks.
So, before cruising the article you might want to pencil in a game plan for your brisket.
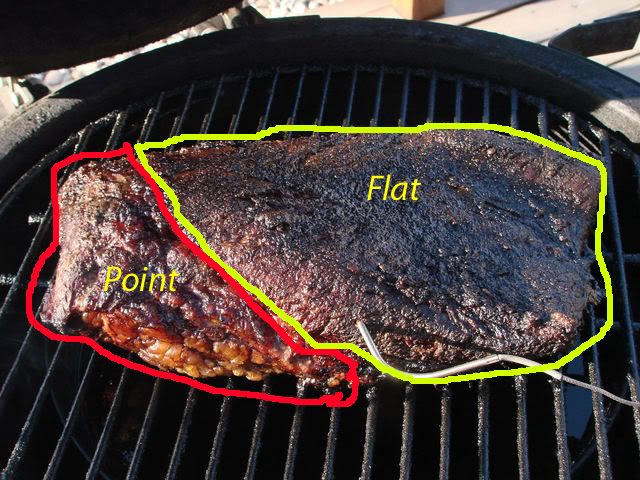
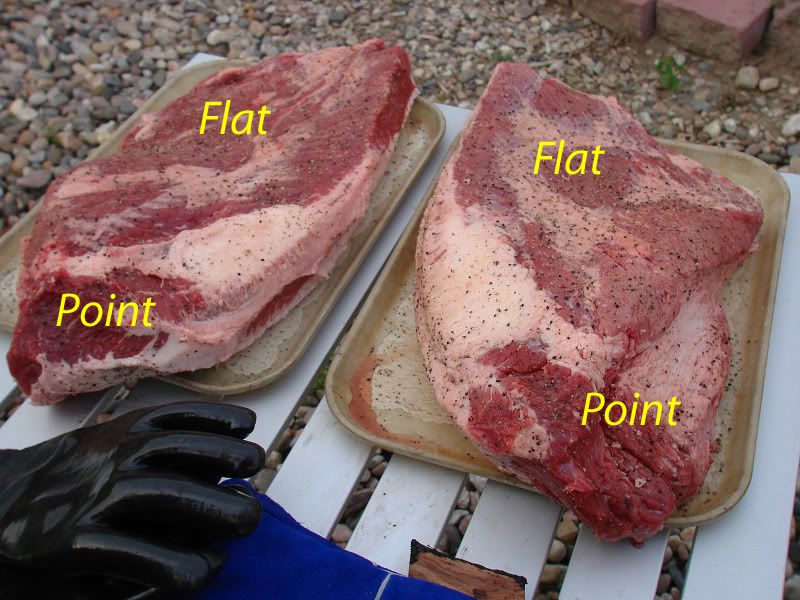
Let's get started... I get the best results with whole un-trimmed briskets, sometimes referred to as "packers" that have been graded "choice and up". If you can locate a USDA Prime brisket, give them a try because they will have better marbling and are a little easier to cook. A whole brisket is made up of two muscles. The leaner flat and the fattier point. I like to buy them in the 10 to 13 pound range. I try to select one with an even thickness flat that does not taper off on one end and I like a knotty or rounded point. (If there is a long taper on the flat, just plan on cutting an inch or two off) I look for an even layer of fat about 1/4" thick, if it's thicker you can trim it yourself. Take a tape measure to the market and measure the length to make sure it will fit on your cooker. I recently saw a 19.25 pound brisket that was 25" long. Here are a couple of pictures to help you identify the point and flat.
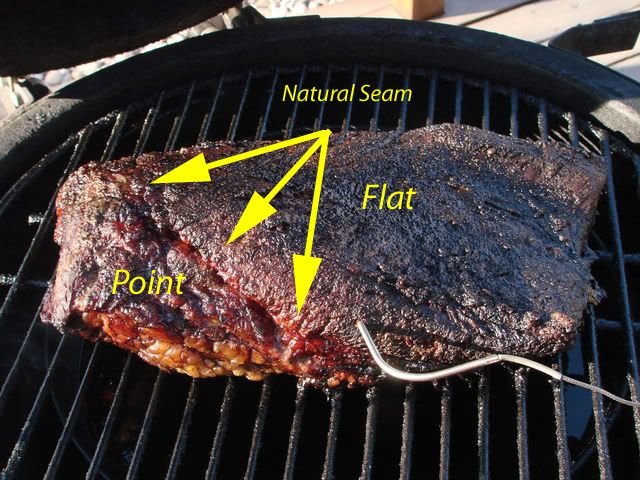

When preparing a brisket, my first decision is to leave it whole or to remove the point. I have no problems with cooking the flat and point separately, I just want to be the one doing the separating of the muscles and trimming of the fat. I used to follow the natural seam between the point and flat, but this gave me a flat that had a taper on both ends. Now I look at the overlap area of the two muscles and make a straight cut, leaving me with a flat with about 2 or 3 inches of point attached. Most store bought flats are trimmed too close to suit me, so if I want to only cook a flat, I still buy a whole brisket and cut it down myself. I either freeze the point for later or cook it separately with the intention of making burnt ends for the freezer (which may or may not make it to the freezer)... I will remove some of the thick hard fat around the point and the thick fat on the edge of the point (this is a thick wedge of fat that goes into the brisket for an inch or two), so from the side make thin slices staying in the fat (not the meat) and cut out the kernal of fat. Next, trim the remaining fat to a consistent thickness. On either a whole or cut-down brisket, I often leave a moderate amount of fat in place if I'm going for a lower temp traditional cook. On my hot-n-fast briskets I do trim more fat. And on my competition trim briskets, I remove a lot of fat. I will publish a separate article on competition brisket. For a backyard brisket, a little more fat is some insurance for cooking a good brisket.
TENDERIZING / FLATTENING - This is an option, and not necessary but if you have ever pounded out a veal cutlet or a chicken breast, you know the benefits of a good meat hammer. A brisket however is a pretty big hunk-o-beef, so you need something bigger, like an industrial sized rubber mallet. If you decide to try this, keep the brisket in the cryo-package. I give the flat more attention, but I do work over the point in the overlap area. After trimming some of the heavy fat a pounded brisket tends to lay out flatter.
SEASONING: My choice of seasoning is very basic and I apply it 2 or 3 hours before cooking. I've never actually measured the amounts. As a minimum seasoning I use fine grind canning or sea salt, coarse black pepper, and cayenne. (if this is mixed ahead of time and stored in a Mason jar something special happens, it's better than just sprinkling on the ingredients separately). Several joints in Lockhart, Texas have been using a seasoning along these lines for 50+ years. Adding granulated garlic and sometimes granulated onion (my favorite being the toasted granulated onion from Penzey's), and/or some celery salt or ground celery seed is the next option as celery is naturally high in nitrates. Some sea salts also contain nitrates which may help out the smoke ring. More about that later. My next choice for seasoning is a Smokey Hale mixture that brings all of my favorite beef seasonings together.
1 cup coarse sea or kosher salt
¼ cup granulated garlic
¼ cup granulated onion
1/8 cup ground thyme
1/8 cup ground bay
1/8 cup black pepper
1/8 cup celery seed
1/8 cup Hungarian paprika
SLATHER: IS a fancy word for a "wet rub". They can be complex or simple. If I use one, it's a mixture of prepared yellow mustard and a splash of Worcestershire sauce to thin it out. I paint a thin coating on the brisket after applying the rub. Not only does it anchor the rub, I think it locks in moisture and makes for a nicer bark.
INJECTIONS: Injections are very popular on the competition trail. The first mention of them sparked an interest for me. Over the years I have tried several different injection recipes. If I inject, I shoot them with 1 to 2 ounces per pound before adding the rub. Injections are room temperature when using(see exception for late injection below). I have a couple of injection recipes which can be found on my "Injection Page" and I have some insight to doing an "early" and "late" injection.
Injection logic calls for using a slightly strong injection (flavor and salt) because you have to consider that the brisket will be cooking 10, 12 or even 14 hours depending on your pit temp. A few years ago, fishlessman from the Big Green Egg Forum suggested a "late injection" to me and I really like the results. I have found that any late injection should be lower in salt because the final few hours of cooking is not long enough to cook the salt into the meat. I also heat my late injection so I won't impact the cooking process very much.
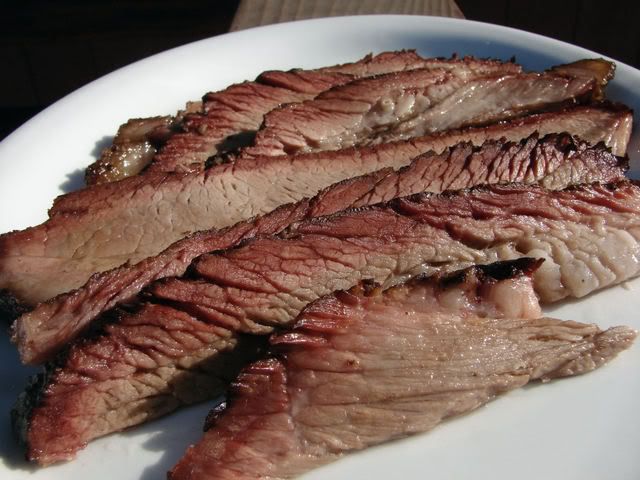
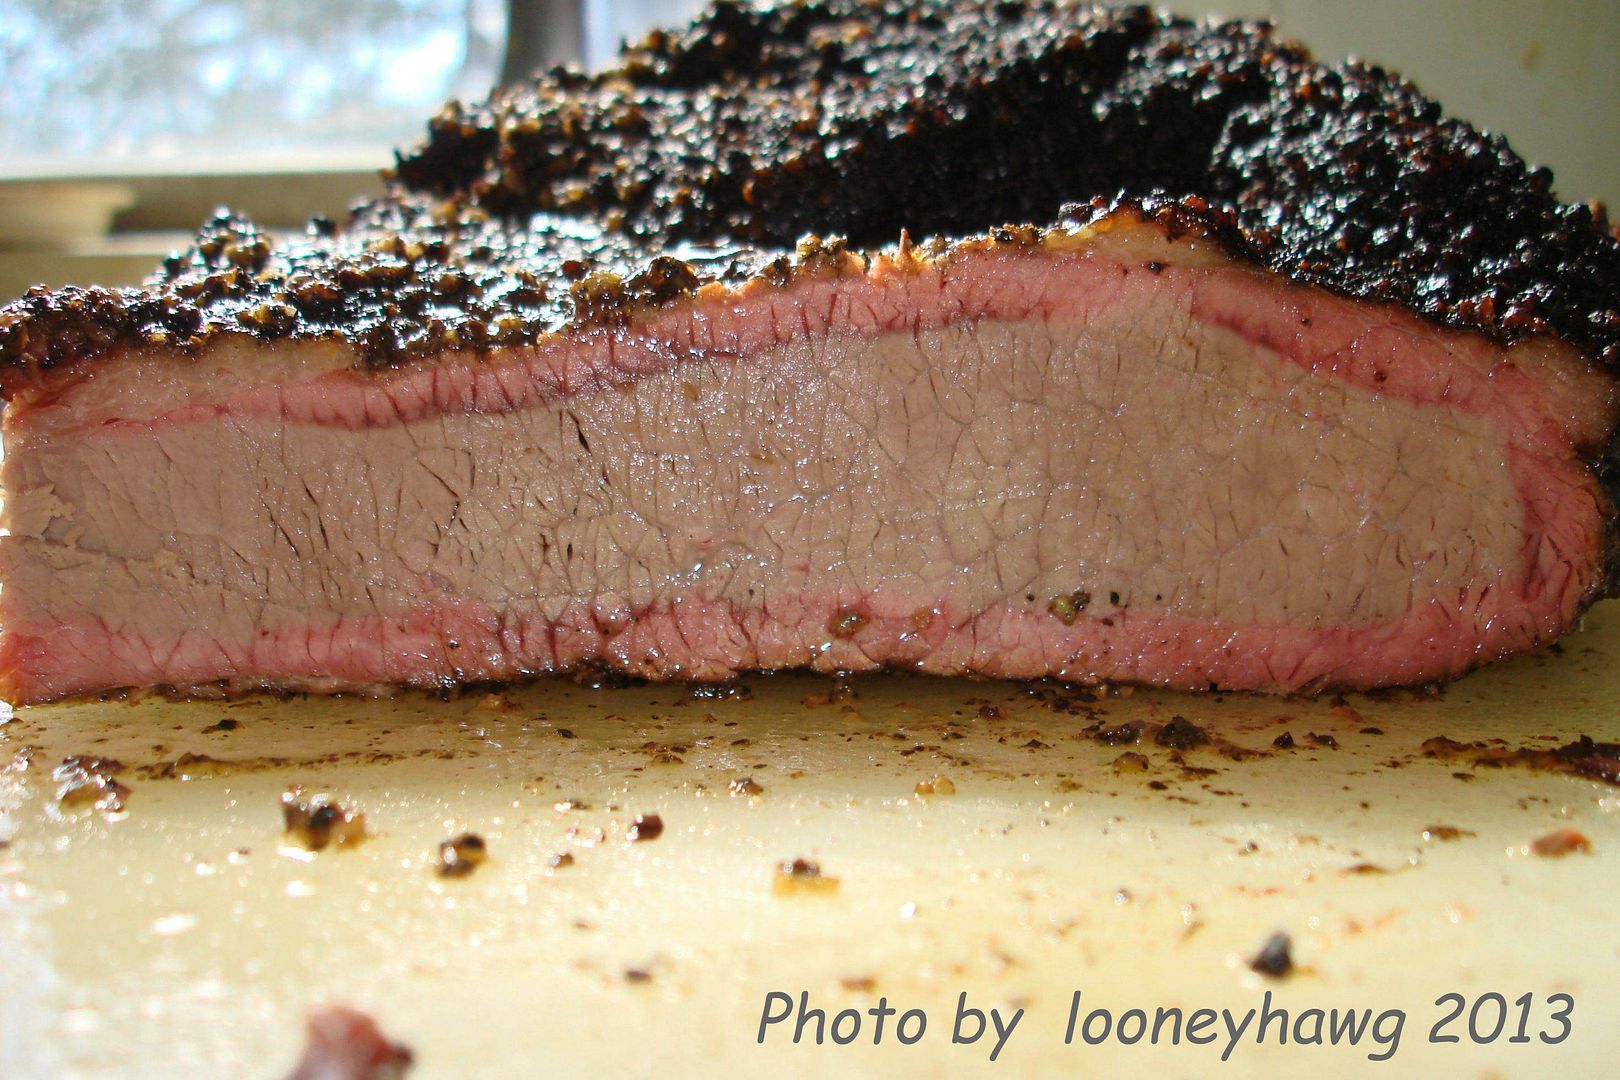
Here is a perfect example of an injected brisket. This photo was provided by looneyhawg. The brisket was injected with a beef base and aujus mixture, then seasoned with salt and pepper, and cooked with hickory wood. Brisket is really hard to photograph, but this photograph captures it perfectly.
COOKING PROCEDURE(S)
I start all briskets off with a low temperature fire, 200° if I can hold it. Pecan is my wood of choice, and this early part of the cook is when you will get some smokey flavor. After a couple of hours I ramp up the pit temp to 225°-240° and usually finish around 250° or 275°. (also check out the high temp brisket cooking below.) The type of pit you have determines cooking "fat up", "fat down" and the amount of turning. Everyone has formed an opinion(s) on this subject from their own experience, and here are mine... fat protects and insulates the brisket from heat, so if your heat comes from below your brisket will cook most of the time with the fat cap down. With an off set cooker or horizontal drum I start fat side up and turn every 2 or 3 hours. In my BDS I start fat side down for 2 hours, turn fat side up for 3 or 4 hours, turn fat side down until finished. On my Big Green Egg, I use an indirect set-up and cook fat side down for the entire cook (unless I just really feel like turning it for a couple of hours) I don't buy into the "never open the cooker" philosophy for cooking briskets....I guess I'm too hands on, or maybe too picky.
About 6 or 8 hours into the cook (or 2/3 of the guestimated cook time) I like to stick my brisket with an ice pick (to judge tenderness) or with my cable thermometer, which is just a "smart ice pick", to actually see what's going on. Probe in the direction shown, don't come in from the side or the end.
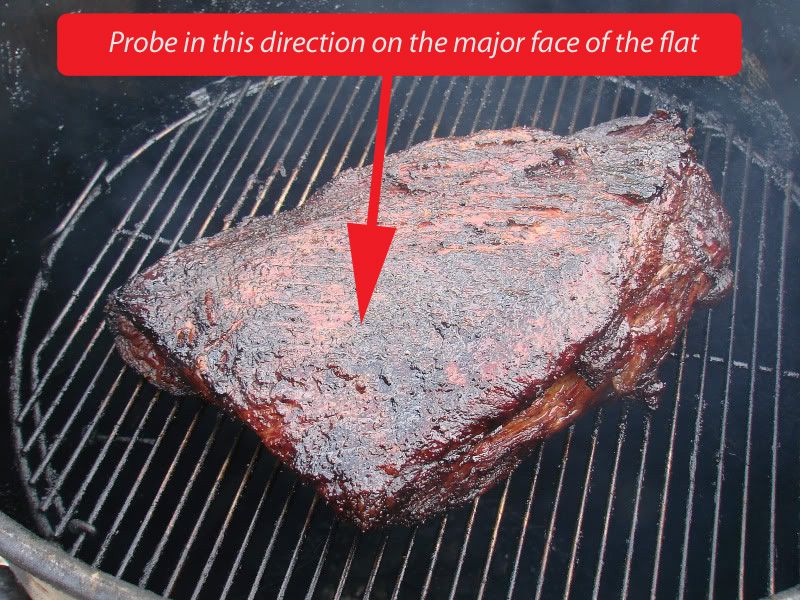
PROBING: What is the best way to probe a brisket? Ideally, you want to monitor tenderness by judging resistance to the probe in both directions.... sliding in and pulling back out. It might feel tender sliding in, but might not slide out easily. When it feels tender sliding in and back out you are getting close. What should "tender" feel like? Well, if you read enough about barbecue, sooner or later someone will declare that their probe slid in just like that brisket was butter. Heheehee, okay I don't quite buy that comparison....., that's pretty dang tender. But most of us have baked potatoes, and monitored their tenderness while cooking... right? Well, I think a brisket flat is tender when it feels like a tender baked potato. You can also stick your probe into a jar of peanut butter, this also simulates the tenderness you are after in the flat.
WHEN TO PROBE A NO-WRAP BRISKET: Wait until your internal temperature is around 180° and do your first probe. Take a mental note of the tenderness. Make another reading when your internal temperature is around 190°. Compare the tenderness to your first probing. If you don't like the feel, check it again at 195°, and again at 200°. No matter what kind of probe you are using, pick an area in the flat and probe in the direction shown above. Don't come in from the side or the end. I don't worry about the point, it's usually done before the flat and since it has a higher fat content, it will take care of itself. Sometimes I'll have a brisket get tender around 190°. However, a lot of my briskets have cooked themselves tender between 195° and 203°. Now, I'm cooking at 5300' elevation, and at my house water boils at 203°, so if you are cooking at lower elevations your results may vary. The bottom line is... trust your probe before a thermometer or a clock.
I see no reason to monitor the meat temp during the entire cook. Because of the fat in the point it cooks a few degrees hotter than the flat. It will also get tender faster than the flat, which means it is done before the flat..... So it is not the place for monitoring internal temperature or tenderness. Don't worry about overcooking the point, that fat will protect it. (In fact a second cook of the point is done when making burnt ends, covered later on...) For accuracy, the temperature probe should go into the flat and get it in about 2". Don't put in a thin area, and don't put it close to an edge. The internal temperature will plateau or stall around 160° to 170° as moisture in the meat finds it's way to the surface and begins to evaporate, don't worry about this, it will pass. Above 170° collagen begins to melt and convert to gelatin improving moistness and tenderness. When the internal temperature gets to 185° start monitoring doneness with your ice pick or a skewer. Probe the flat from the face opposite the fat cap, NOT from the edge. You only want a slight resistance when probing. Some folks mention probing with a fork, this will work but you are putting three or four holes in the meat each time. I stick with an ice pick. Because I like a long rest, most of my brisket is pulled WHEN TENDER (195° and higher), wrapped in foil (1 or 2 ounces of broth is added before sealing the foil) and put into a Cambro hot box or a dry cooler, insulated with wadded up newspaper. When the brisket goes in to the cooler, make sure the fat is up so the meat is in contact with the juices in the pouch. During the first hour, the internal temp will rise as the brisket is continuing to cook. I like to hold them for several more hours. As long as the internal temperature is 150° or above, you will have no food safety worries. If you are planning on a shorter rest time, say 1 or 2 hours, you may want to cook your brisket a little more tender, meaning a higher internal temperature. If it's too tender when slicing, just make the slices thicker.
BRISKET WITH A WRAPPED FINISH: Another option is wrapping a brisket in foil once the internal temperature approaches 155° to 165° and returning it to the cooker until it is cooked tender. Many people (especially newer brisket cooks) prefer wrapping, then cooking the brisket tender in a foil pouch. This method helps the brisket stay moister and there will be some foil juices in the pouch which can be added to a sauce or used as an AuJus. The dark "bark" on the brisket will soften in the foil, but this is not a big deal for me. PROCEDURE: Smoke the brisket until the internal is 155° or so and you have some nice color. Don't worry about probing, it will still be tough. Lay out a double layer of foil wide enough to wrap the entire brisket. Mix some jazzed up beefy broth, AuJus, or use canned beef consume as a base. You need about 1/2 cup. Lay the brisket "fat up" on the foil, bring the sides and ends up and pour the beef in the pouch and seal. RETURN THE FOIL POUCH TO THE SMOKER OR AN OVEN. You are now going to cook the brisket tender. In about 2 hours, remove the pouch and carefully open the top. Check the internal temperature in the flat, and probe for tenderness. If it doesn't feel like a baked potato or peanut butter, seal the pouch, put back in the smoker and check in another hour. Depending on the size it may take 4 hours in the foil pouch to get the brisket tender, but once it feels good the foil pouch is removed, the top fold of the foil is opened and the brisket is allowed to "vent" for about 5 or 10 minutes. Then the pouch is re-sealed and moved to a cooler and held until serving. Hold the brisket as long as possible. 2, 3 or even 4 hours in a cooler really help a brisket. If you have some newspaper, a towel, or a blanket in the cooler the meat will be very hot when you slice. This wrapping technique is particularly effective with smaller flats in the 4 to 6 pound range (see Cooking Flats below). It is also very useful if you have some time limits which must be met, or just need to speed up your cook. Wrapping can also help you get through the stall. Be advised that you will soften the bark, and loose some of the seasonings to the liquid.
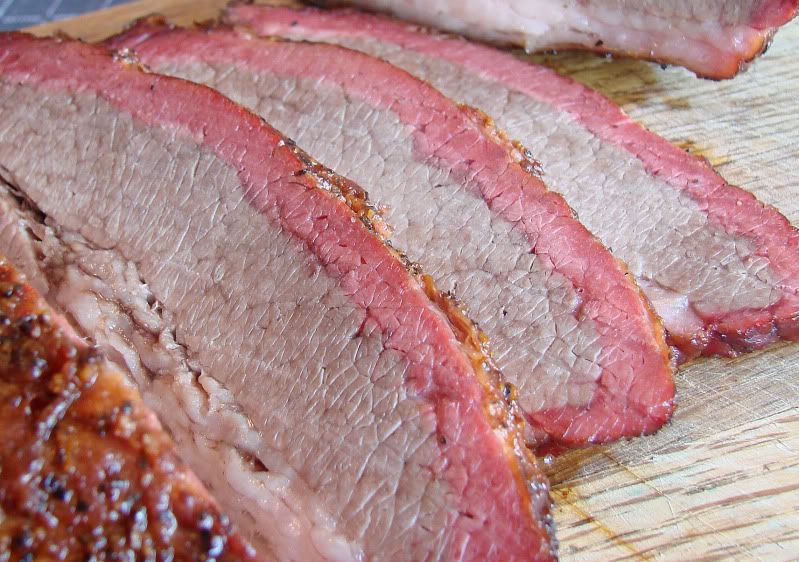
SLICING: For slicing the flat, cut against the grain (slightly off perpendicular). You can make straight cuts or cut on a slight bias. The more tender it is slice it thicker as you want the slices to hold together. For slicing the point also cut against the grain, but remove some of the fat as you go. Serve a little of the moister point along with the flat. A word of caution, brisket will start to dry out right before your eyes. Slice and serve at the same time. Use foil juices to keep the meat moist.
CHPPING: Chopping brisket for sandwiches is an overlooked treat you must try. Save some of the ends or other pieces that are not "first cut" plating quality, add some of the fatty point meat and chop on a cutting board. You want some of the "brownies" in there too for flavor. One or two cleavers work great as does a large chefs knife. Add some sauce and chopped sweet onion then serve on white bread or buns. This is hard to beat.
You will most likely notice a slight pink to red border on the meat opposite the fat side. This is called a "smoke ring" and is a natural reaction from the barbecuing process. To some this is something to brag about. Don't worry if you don't get one. If you want to make sure you get one, sprinkle an even layer of Morton's Tenderquick on the side opposite the fat cap and let it set for 10 minutes, then rinse it off in cold water. Dry the brisket and refrigerate for one hour. Then prep the raw brisket as usual with an injection, rub, slather, etc. If you are cooking in a ceramic cooker, or a drum cooker with lump charcoal, adding a charcoal briquette or two on top of your coals will improve your smoke ring. Folks using Cookshack type electric smokers can add a briquette to the wood pan.
BURNT ENDS: One of my favorite treats are burnt ends. Go over to the burnt end page for all of the details.
COOKING AHEAD: Sometimes it is necessary to cook a couple of briskets for serving the next day. I follow my same procedure including some holding time in the insulated cooler. When the internal temperature falls to 165° or 170° I take the entire foil pouch and slip it into a vacuum seal bag and use the seal only button, no vacuum. In fact, I do double seals about 1/2" apart. Then I dump a bag of ice into the cooler and add water. I submerge the briskets in their waterproof bags for about 30 or 40 minutes. You are trying to go from 165° to 40° (or lower) as fast as possible. You can either pack them in ice or dry the bags and store the briskets in the coldest part of your refrigerator until you reheat the next day.
Barbecue leftovers are great and brisket is no exception. I like to save unsliced pieces and vacuum seal them. Some of the de-fatted broth from the foil, some broth or CocaCola work great for reheating liquids. They can be poured over the brisket and partially frozen on a platter before going into the vacuum bags. This stops liquids being sucked into the machine.
~~~~~~~~~~~~~~~~ Cooking Flats ~~~~~~~~~~~~~~~~~~~~~~~~~~~~~~~~~~~~
When I'm doing flats, I prefer to buy a whole one and remove the point myself. I find that store-bought flats have been trimmed too much for my liking. I like flats in the 7 to 9 pound range, so pick out a 13 to 15 pound brisket. I don't worry about following the natural seam between the point and flat....I just make a square cut where I want. Naturally the lower weight will reduce the time intervals for turning and the cook will go much faster. Because I want a moist product, I have no problem using a foil tent or a foil finish on flats. When the internal temp of the flat is around 165° or 170°, I'll remove and inject some warm brisket juice, then add some more of the juice to the pouch before sealing. The flat is cooked at 275° until the brisket begins to get tender. This usually happens when the internal is around 195°. Because flats are easy to handle I will usually turn the flat fat side up in the foil and reseal it, then rest in an insulated cooler for an hour or two.
~~~~~~~~~~~~~~~~~ High Temp Fast Cook Brisket ~~~~~~~~~~~~~~~~~~~~~
2011 marks the 5th year I've been playing with cookin' briskets at higher temperatures. I have lost count of the number of high temp cooks I've done, but it's over 50. Here are some of my thoughts......
First off, "fast cook" doesn't necessarily mean "fast to the table" as I find that a long rest, like 3 or 4 hours works really good for me. The first two hours of the rest are technically part of the cook, as they are when you would do a low-n-slo type of cook, but that last hour or so seems to let the juices equalize within the brisket.
METOD 1 - The Myron Mixon Inspired Method: The first hot and fast method I read about was very simple: Get the cooker in the 325° range and put the brisket on for about 1-1/2 to 2 hours. Check the temperature in the point, yes the point, and remove it when it gets to 160°. Double foil the brisket, lower the pit temp to 300°, return to the cooker (or an oven) for another 1-1/2 to 2 hours. Your target temperature for checking doneness is 190°, you can go as high as an internal of 205° if you prefer very tender brisket. When you have cooked it tender, rest the foiled brisket in a cooler for 2 to 3 hours. Drain off and reserve the liquid from the foil as a dip. I tried this method with good sucess in the moistness and flavor department, and the juice is wonderful. It lacked enough smoky flavor.
METHOD 2 - KickAss Method: My next introduction to this style of cookin' came from Ed over at KickAssBBQ.com. Gradually, I was able to extract more information, a little here and there, from 6 or 8 folks that were using this style of cooking when competing. Each one tweaked the basic hot and fast method above because this method is very "pit dependant", meaning one pit will not act like another. Pit temps ranged from 300° to 375°, Ed cooked in pans in a Lange, others cooked in WSM's (some of which did not use a water pan, or used sand in the water pan).
METHOD 3 - Slow Start High Temp Method: My last source for guideance has been Donny Pitmaster "T", a briskateer with a long history in cooking brisket at high temps, and someone who cooks a lot of brisket. I was happy with both the tenderness and moistness of high temp briskets, but they were not smoky enough for me. To improve the flavor I put a cold brisket on a cooler pit (around 200°) for 1-1/2 to 2 hours. I use mesquite charcoal and a little more flavor wood than normal. At the end of the first stage of cooking, I ramp the cooker up to 325°. In my Egg I don't turn the brisket, in my BDS I turn it every 1-1/2 to 2 hours. When the internal temperature reaches 165°, I inject the brisket with 4 ounces of brisket juice (see above), triple wrap in foil and finish cooking (fat side down) in a 300° cooker or in an oven. I'm not sure if it's the 5400' elevation of my house, the foil pouch, or the high temperature.... but I get a nice product when I cook the brisket to an internal of 205°, followed by a 2 or 3 hour rest. Pitmaster "T" also likes the slow start method. This method is my current favorite, and in addition I've done a quick chill and froze these whole in the foil pouch. They reheat just great in a 275° oven in 2-1/2 to 3 hours.
High Temp Cooking Notes:
To be continued...
![]()